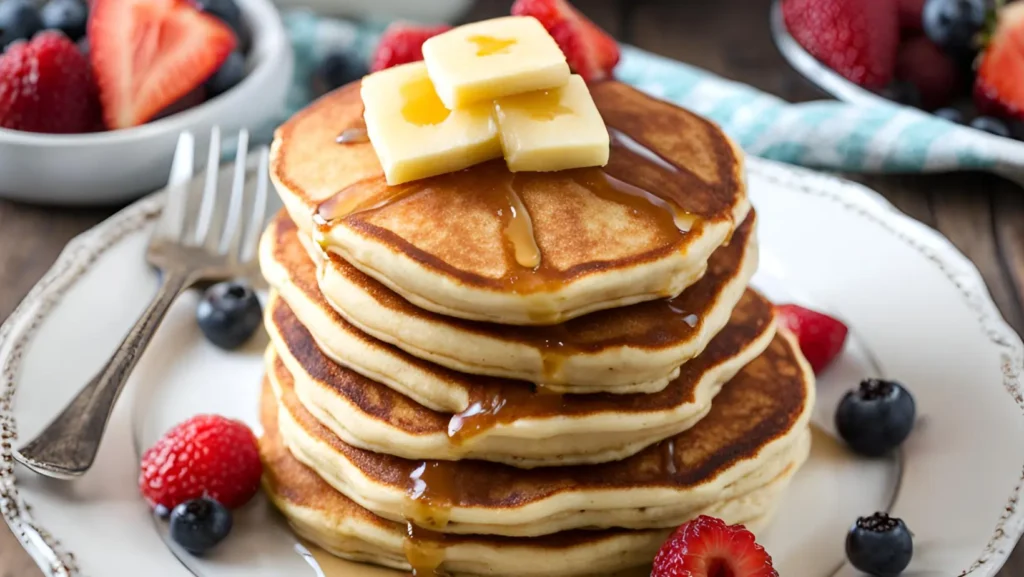
When it comes to breakfast favorites, pancakes are always at the top of the list. However, if you follow a gluten-free diet, finding the perfect pancake recipe can be a challenge. That’s where these gluten-free buttermilk pancakes come in! They’re light, fluffy, and packed with flavor—just like the pancakes you remember, but without the gluten. Whether you’re making them for yourself or serving a crowd, this recipe will satisfy your craving for a warm stack of pancakes with the perfect balance of tangy buttermilk and sweetness. In this article, we’ll show you how to make the best gluten-free buttermilk pancakes, plus tips, FAQs, and ideas for toppings.
Why Choose Gluten-Free Buttermilk Pancakes?
If you’re new to gluten-free cooking, you might wonder why you should choose gluten-free pancakes. Fortunately, there are several reasons why making gluten-free buttermilk pancakes is a great option.
- Healthier Alternative: Many people choose a gluten-free lifestyle for health reasons, such as managing celiac disease, gluten sensitivity, or other health conditions. For more on why you should consider going gluten-free, check out our guide on The Health Benefits of a Gluten-Free Diet.
- Inclusive for Everyone: By making your pancakes gluten-free, you’re ensuring everyone, regardless of dietary needs, can enjoy this classic breakfast. Gluten-free recipes are also a great way to introduce more variety to your meals.
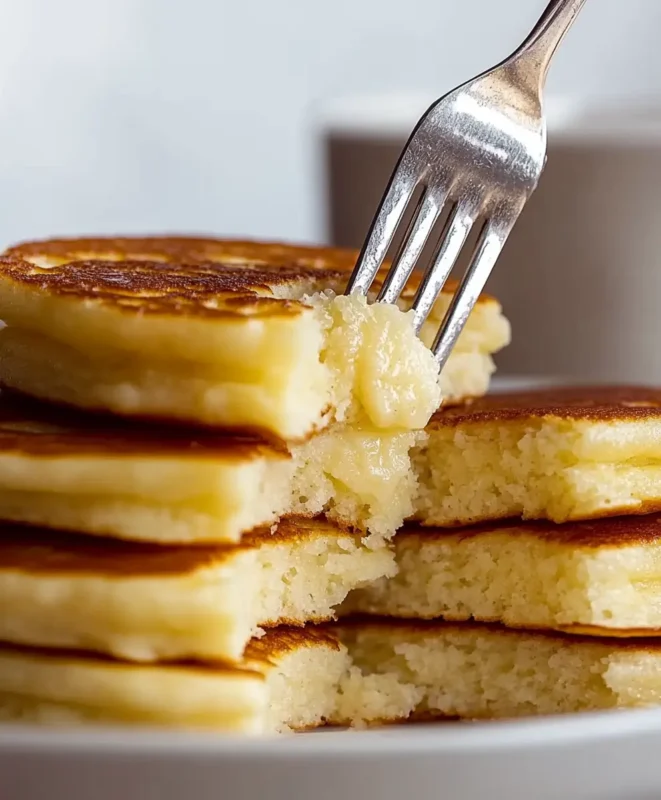
- Fluffier Pancakes: Gluten-free pancakes often have a lighter, fluffier texture compared to their gluten-filled counterparts, especially when paired with buttermilk.
Furthermore, when you use gluten-free flour and other simple ingredients, you can create a pancake that rivals traditional recipes. With the tanginess of buttermilk and the fluffiness from gluten-free flours like rice flour and tapioca starch, you’ll be able to create a pancake that’s moist, tender, and irresistible.
What You’ll Need to Make Gluten-Free Buttermilk Pancakes
Before you start, make sure you have these basic ingredients on hand. They’re easy to find and can be swapped if needed:
- Gluten-Free Flour: Use a high-quality gluten-free all-purpose flour blend. For the best results, choose a blend that contains a mixture of rice flour, potato starch, and tapioca flour. If you’re unsure which gluten-free flour blend to pick, check out our list of Best Gluten-Free Flour Brands.
- Buttermilk: This is the key ingredient that gives these pancakes their signature tang and tenderness. If you’re dairy-free, there are great alternatives like almond milk with a tablespoon of vinegar or lemon juice.
- Eggs: Eggs help bind the ingredients together and contribute to the fluffiness of the pancakes.
- Baking Powder: This will help the pancakes rise and become fluffy.
- Sugar: A touch of sugar sweetens the batter, but you can use alternatives like honey or maple syrup if you prefer.
- Salt: A small pinch enhances the flavors and perfectly balances the sweetness.
- Butter or Oil: You’ll need this for greasing the pan or skillet and to add richness to the pancakes.
Once you have everything ready, you’ll be able to make the perfect gluten-free buttermilk pancakes!
How to Make Gluten-Free Buttermilk Pancakes
Making gluten-free buttermilk pancakes is quicker than you might think. In fact, this recipe is simple and yields pancakes that are both light and delicious. Here’s how you can make them:
Ingredients:
- 1 ½ cups gluten-free all-purpose flour
- 2 tablespoons sugar (or your preferred sweetener)
- 1 tablespoon baking powder
- ½ teaspoon salt
- 2 large eggs
- 1 ½ cups buttermilk (or non-dairy milk + 1 tablespoon vinegar or lemon juice)
- 4 tablespoons melted butter (or oil for dairy-free)
- 1 teaspoon vanilla extract (optional)
- Butter or oil for cooking
Instructions:
Follow these simple steps to create light, fluffy, and flavorful gluten-free buttermilk pancakes every time!
1. Prepare the Dry Ingredients
- In a large mixing bowl, whisk together gluten-free flour, baking powder, baking soda, salt, and sugar until well combined.
- This guarantees the leavening agents are evenly spread, ensuring a uniform rise.
💡 Pro Tip: Sifting the dry ingredients creates an extra-light batter!
2. Mix the Wet Ingredients
- In a separate bowl, whisk together buttermilk, eggs, melted butter (or oil), and vanilla extract until smooth.
- Let it sit for a minute to allow the buttermilk to react with the baking soda for extra fluffiness.
💡 Dairy-Free Option: Substitute buttermilk with almond milk + 1 tbsp lemon juice for the same effect.
3. Combine Wet & Dry Mixtures
- Slowly add the wet ingredients to the dry mixture, gently stirring with a spatula.
- Mix until just combined—a few small lumps are okay! Overmixing can make pancakes dense and tough.
💡 Pro Tip: Let the batter rest for 5–10 minutes to allow the flour to hydrate for a softer texture.
4. Heat the Pan & Cook the Pancakes
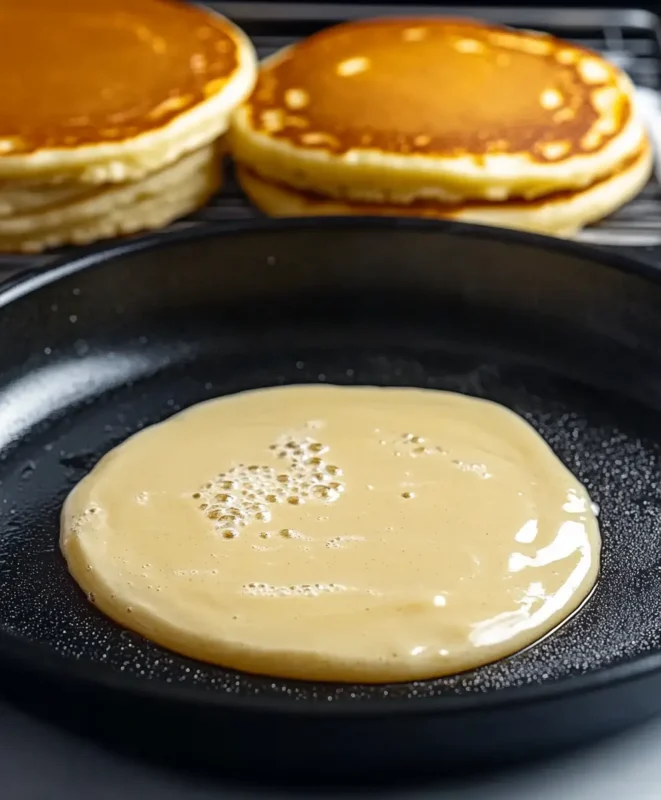
- Warm a nonstick skillet or griddle over medium heat and lightly coat it with butter or oil.
- Spoon ¼ cup of batter onto the skillet for each pancake.
- Cook for 2–3 minutes, until bubbles appear on the surface and the edges begin to set.
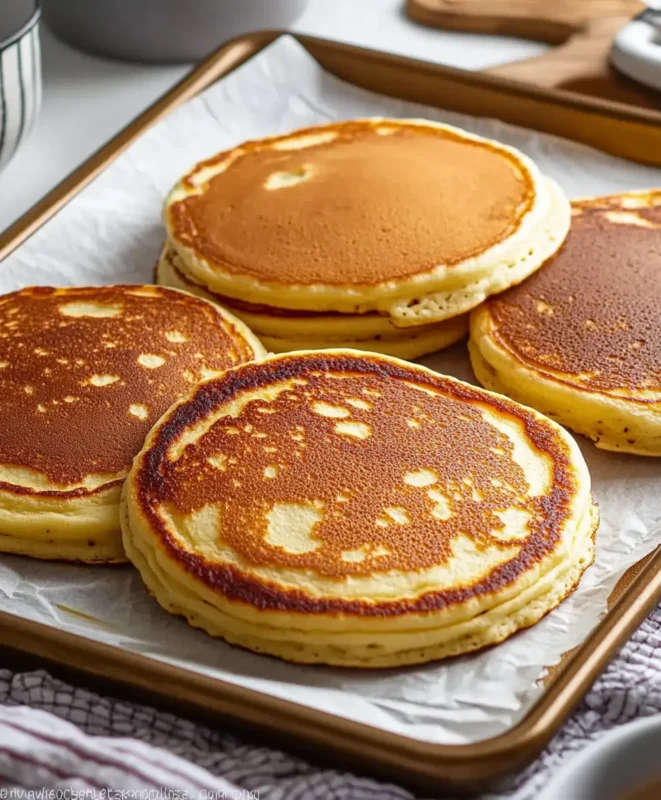
- Gently flip and cook for another 1–2 minutes, until golden brown.
💡 Best Heat Setting: Medium-low heat prevents burning while ensuring a fluffy center.
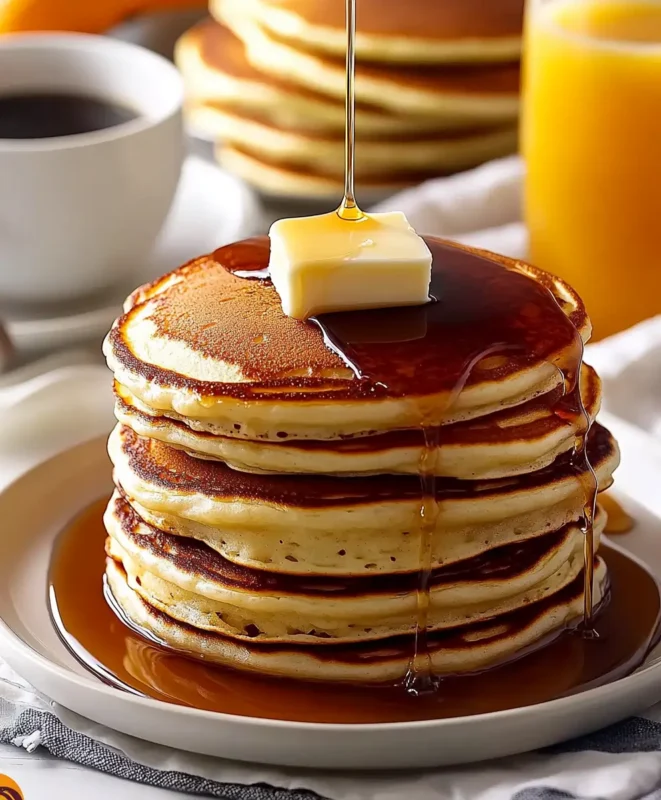
5. Serve & Enjoy!
- Transfer cooked pancakes to a warm plate and cover loosely with foil to keep them warm.
- Serve with your favorite toppings—maple syrup, fresh fruit, yogurt, or nut butter!
💛 Made with love, just for you. Enjoy every bite! 🥞✨
Tips for Perfect Gluten-Free Buttermilk Pancakes
To ensure that your gluten-free buttermilk pancakes turn out perfectly, here are a few helpful tips:
- Let the batter rest: Letting your batter rest for 5-10 minutes before cooking helps the gluten-free flour absorb the liquids and gives you a better texture. This can also make the pancakes fluffier.
- Don’t over-mix the batter: Gluten-free flour doesn’t behave the same as wheat flour, so mixing too much can result in dense pancakes.
- Use a non-stick pan: This helps prevent sticking and ensures an even golden-brown color on your pancakes.
- Adjust the heat: If your pancakes are browning too quickly or too slowly, adjust the heat. Medium heat works best.
Serving & Topping Ideas for Gluten-Free Buttermilk Pancakes
The beauty of gluten-free buttermilk pancakes is their versatility—whether you love a classic drizzle of syrup or want a creative, nutrient-packed twist, the possibilities are endless. Here are some unique serving ideas to elevate your pancake experience:
1. Classic & Comforting Toppings
These timeless choices bring out the warm, fluffy goodness of your pancakes:
- Pure Maple Syrup & Butter – The ultimate classic. Use warm, grade A maple syrup for the best natural sweetness.
- Honey & Cinnamon Dusting – A natural alternative to syrup with a touch of spice.
- Fresh Berries & Whipped Cream – Strawberries, blueberries, or raspberries add freshness, while homemade whipped cream makes it indulgent.
💡 Pro Tip: Lightly heat your syrup before pouring it over pancakes for an even richer flavor.
2. Healthy & Nutritious Options
Boost the nutritional value without sacrificing taste:
- Greek Yogurt & Chia Seeds – A protein-packed combo with gut-friendly probiotics. Add a drizzle of raw honey for natural sweetness.
- Almond Butter & Banana Slices – A great mix of protein, healthy fats, and potassium. Use crunchy almond butter for extra texture.
- Toasted Coconut & Dark Chocolate – Sprinkle unsweetened coconut flakes and a few dark chocolate chips for a fiber-rich treat.
💡 Pro Tip: Use coconut yogurt for a dairy-free, gut-friendly alternative.
3. Protein-Packed & Savory Twists
For those who prefer a non-traditional, protein-rich meal:
- Soft Scrambled Eggs & Avocado – A creamy, protein-rich combo perfect for a balanced breakfast.
- Smoked Turkey & Cheddar Cheese – A savory-sweet mix that pairs surprisingly well with pancakes.
- Sautéed Spinach & Feta Cheese – A Mediterranean-inspired twist full of vitamins and flavor.
💡 Pro Tip: If making savory pancakes, reduce the sugar in your batter slightly for a better balance.
4. Gourmet & Indulgent Creations
When you want to impress guests or treat yourself, try these elevated toppings:
- Mascarpone & Caramelized Figs – A creamy, Italian-inspired luxury. Caramelize figs in a touch of honey & butter for extra depth.
- Espresso Drizzle & Cacao Nibs – Perfect for coffee lovers! Mix a shot of espresso with maple syrup & vanilla extract for a unique glaze.
- Peanut Butter Mousse & Crushed Pretzels – A salty-sweet masterpiece that balances textures beautifully.
💡 Pro Tip: Drizzle warm almond or peanut butter for a smooth, spreadable topping.
Popular Gluten-Free Pancake Variations
While the classic gluten-free buttermilk pancakes are amazing on their own, you can always experiment with fun variations. Here are a few ideas to try:
- Banana Pancakes: Add mashed banana to the batter for a natural sweetness and extra fluffiness. The bananas also help bind the batter together, making the pancakes extra moist.
- Blueberry Pancakes: Fold in fresh or frozen blueberries for a burst of fruit in each bite. This adds sweetness and color to your pancakes.
- Chocolate Chip Pancakes: Stir in a handful of gluten-free chocolate chips for a decadent twist. These make the perfect treat for anyone with a sweet tooth.
- Cinnamon Spice Pancakes: Add cinnamon and nutmeg to the batter for a warm, spiced flavor. This version is particularly comforting during the colder months.
If you’d like to explore more fun variations, check out our guide on Creative Pancake Ideas.
Storing & Reheating Gluten-Free Pancakes
Gluten-free buttermilk pancakes are best enjoyed fresh, but with the right storage and reheating methods, you can keep them just as fluffy and delicious for later. Here’s how to store and reheat them properly without losing their texture or flavor.
How to Store Gluten-Free Pancakes
1. Refrigerating for Short-Term Storage (Best for 2–3 days)
- Let pancakes cool completely to prevent moisture buildup.
- Layer them with parchment paper to prevent sticking.
- Store in an airtight container or a ziplock bag, removing as much air as possible.
- Keep in the coldest part of the fridge to maintain freshness.
💡 Pro Tip: If you plan to eat them the next day, store them in a single layer to prevent sogginess.
2. Freezing for Long-Term Storage (Best for up to 2 months)
- Place pancakes in a single layer on a baking sheet and freeze for 30–60 minutes (this prevents sticking).
- Once firm, transfer them to a freezer-safe bag or container with parchment paper between layers.
- Mark the date to keep track of freshness.
💡 Pro Tip: Freezing them individually first prevents clumping and makes it easier to grab just one or two at a time.
How to Reheat Gluten-Free Pancakes
To keep your pancakes light and fluffy, use the right reheating method based on how much time you have.
1. Stovetop (Best for maintaining texture) ⏳ 3–5 minutes
- Heat a nonstick pan over low-medium heat.
- Add a tiny bit of butter or oil to restore moisture.
- Flip occasionally until warmed through.
💡 Why it works: This method keeps pancakes golden and crispy on the outside while staying soft inside.
2. Oven (Best for reheating large batches) ⏳ 10 minutes
- Preheat oven to 350°F (175°C).
- Arrange the pancakes in a single layer on a baking sheet.
- Cover with foil to prevent drying out.
- Heat for 8–10 minutes until warm.
💡 Why it works: The oven evenly heats multiple pancakes without making them rubbery.
3. Toaster (Quick & crispy) ⏳ 2–3 minutes
- Place frozen or refrigerated pancakes directly in the toaster.
- Toast on medium setting until warm and slightly crispy.
💡 Best for: Pancakes that were stored without too much moisture.
4. Microwave (Fastest but tricky) ⏳ 30–60 seconds
- Place pancakes on a microwave-safe plate.
- Place a damp paper towel over them to maintain moisture.
- Heat in 15-second intervals, flipping between bursts.
💡 Pro Tip: The microwave works best for soft pancakes, but avoid overheating as it can make them chewy.
FAQs About Gluten-Free Buttermilk Pancakes
1. Can I use any gluten-free flour for pancakes?
Yes! However, it’s best to use a gluten-free all-purpose flour blend. These blends are specifically formulated to mimic the texture and taste of regular flour. Some blends already contain xanthan gum or guar gum, which helps with the structure of the pancakes.
2. Can I make these pancakes dairy-free?
Absolutely! Substitute the buttermilk with a dairy-free milk, such as almond or coconut milk. For the best results, add a tablespoon of vinegar or lemon juice to mimic the tanginess of buttermilk. You can also use a dairy-free butter or oil in place of regular butter.
3. How can I make my pancakes fluffier?
For fluffier pancakes, be sure to use enough baking powder and let the batter rest. Allowing the batter to rest gives the flour time to absorb the liquid, which helps the pancakes rise more and become fluffier.
4. Can I freeze these pancakes?
Yes! After cooking, allow your pancakes to cool completely. Stack them with parchment paper between each pancake, then freeze them in an airtight container. You can easily reheat them in the toaster or microwave for a quick breakfast.
5. How long do gluten-free pancakes last?
Freshly cooked gluten-free pancakes can be stored in the refrigerator for up to 3 days. For extended storage, freezing is the ideal choice.
Conclusion
In conclusion, these gluten-free buttermilk pancakes are the perfect way to start your day. Whether you’re gluten-sensitive, following a gluten-free diet, or just looking to try something new, this recipe will give you a satisfying and tasty meal without sacrificing flavor or texture. By following our tips and using high-quality ingredients,